Hand-Release Push-Up (HRP) - Army ACFT Event

Perform as many hand release push ups as possible within 2 minutes.
Fitness Components:
This event measures upper-body muscular endurance, and represents repetitive and sustained pushing used in combat tasks.
Equipment:
Kettlebells
Scoring:
60 and 100 point scores: 10 and 60 repetitions
Proper Technique:
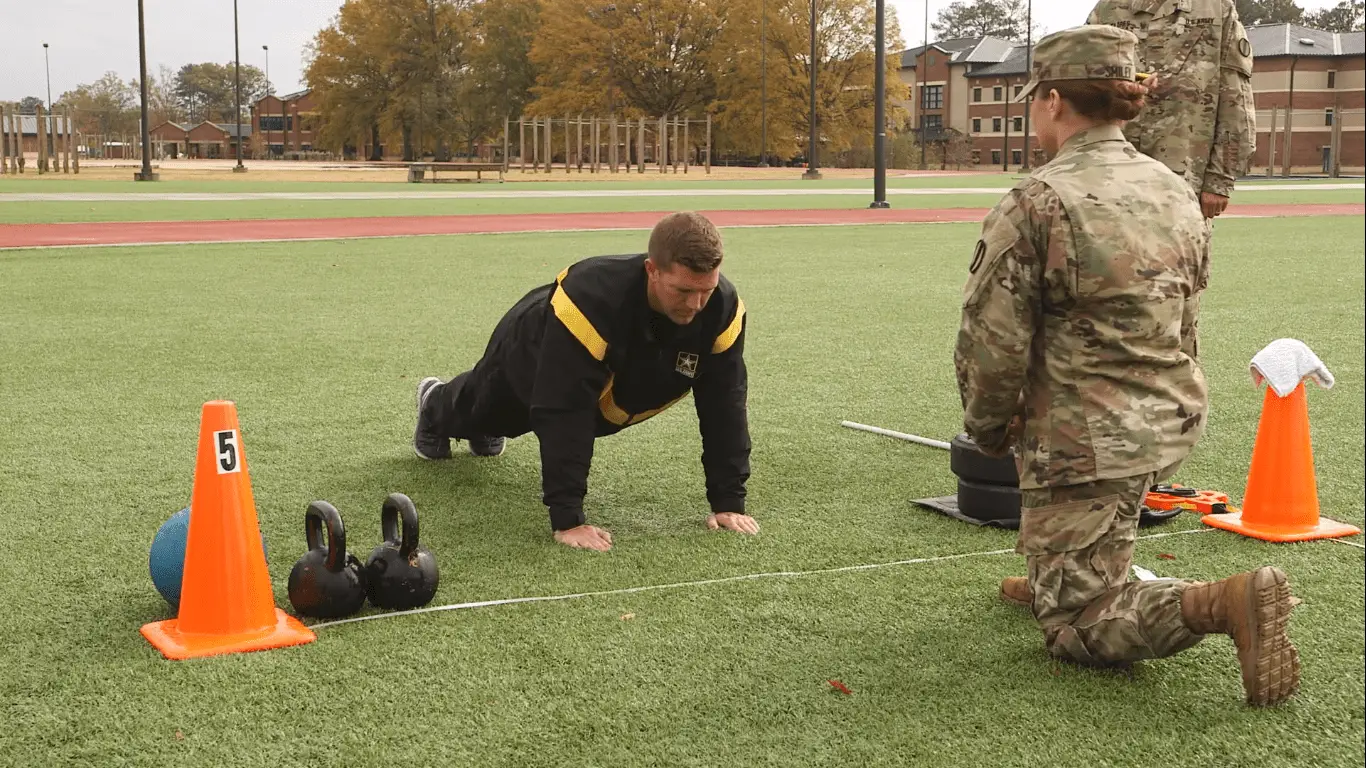
Starting position
On the command of “GET SET,” one Soldier in each lane will assume the prone position facing the start line with hands flat on the ground and index fingers inside the outer edges of the shoulders. The chest and front of the hips and thighs will be on the ground. Toes will touch the ground with feet together or up to a boot’s width apart. The ankles will be flexed. The head does not have to be on the ground. Feet will remain generally together, no more than a boot’s width apart, throughout the HRP. Soldiers may adjust their feet during the test event as long as they do not lift a foot off the ground.

Movement 1
On the command “GO,” a Soldier will push their whole body up from the ground as a single unit to the up position by fully extending the elbows (front leaning rest).
- The Soldier will maintain a generally straight body alignment from the top of the head to the ankles. This generally straight position will be maintained for the duration of the HRP.
- Failing to maintain a generally straight alignment during a repetition will cause that repetition to not count.
- The front leaning rest is the only authorized rest position. Bending or flexing the knees, hips, trunk, or neck while in the rest position is not authorized.
Movement 2
After the elbows are fully extended and the Soldier has reached the up position, the Soldier will bend their elbows to lower the body back to the ground. The chest, hips, and thighs should touch down at the same time. The head or face does not have to contact the ground.
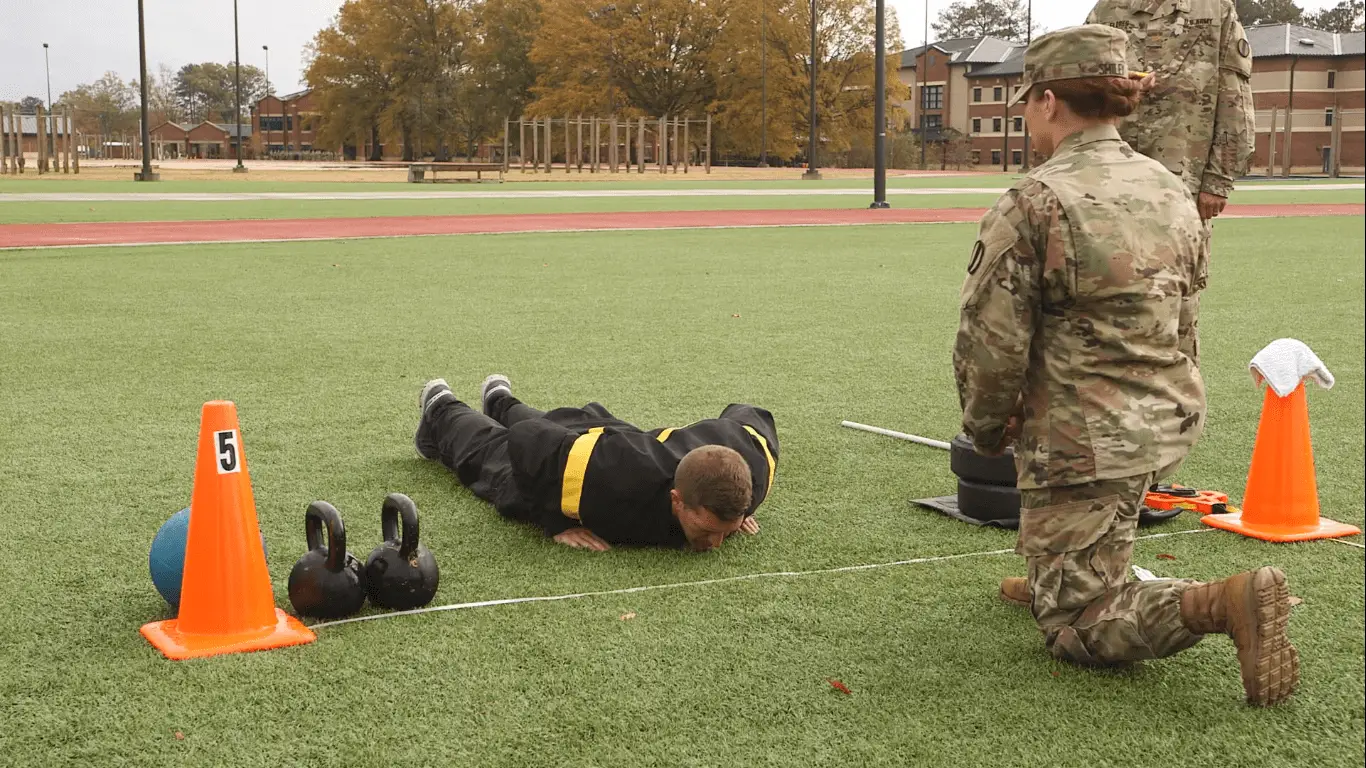
Movement 3A
Arm Extension HRP – immediately move both arms out to the side straightening the elbows into the T position. After reaching this position, the elbows bend to move the hands back under the shoulder.
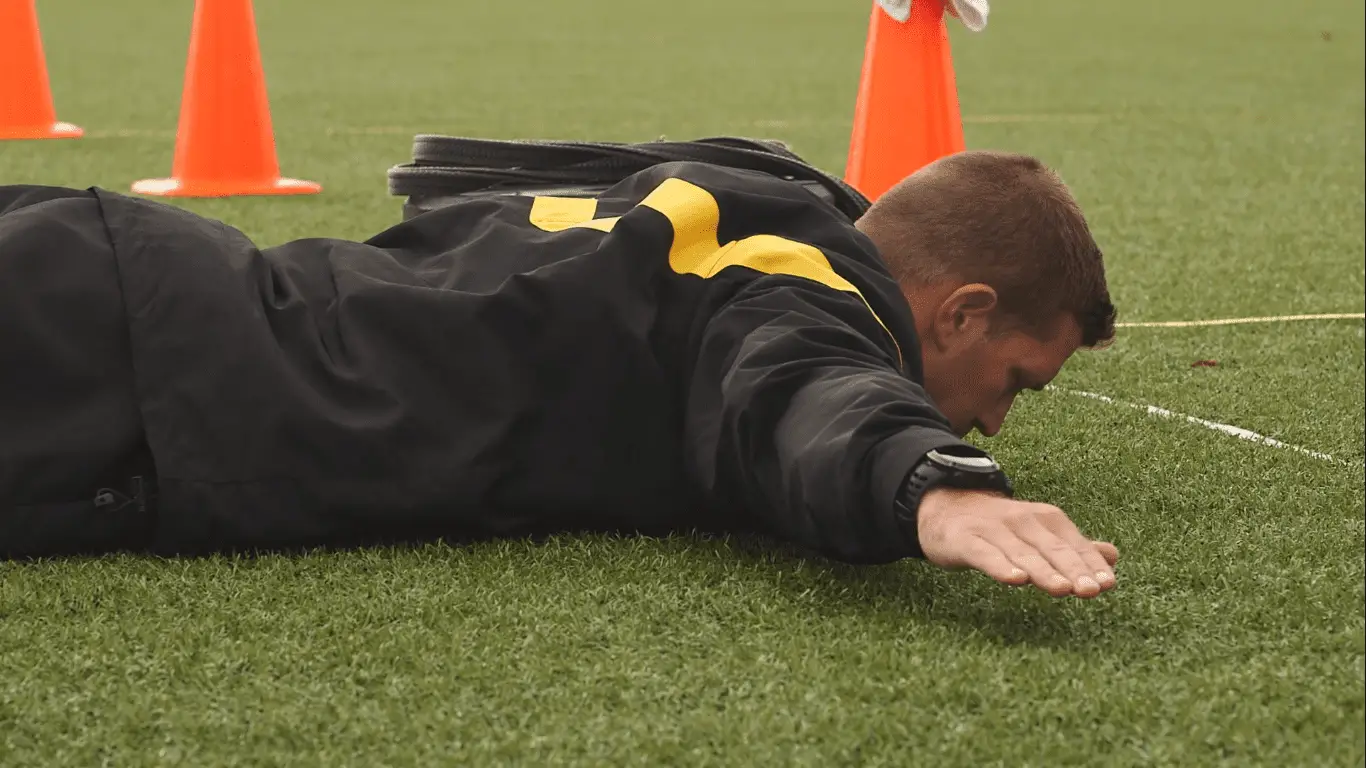
Movement 3B
This is the hand Lift hand-release pushup. Without moving or lifting the head, body, legs, or feet, the Soldier will lift both hands from the ground at the same time. A clear gap between the palms and the ground must be visible to the grader. Failure to lift the hands off the ground will result in that repetition not counting. The hands are then lowered under control until they return to the start position. Soldiers may not “slam” their hands into the ground to start the next repetition; this will cause the repetition not to count.
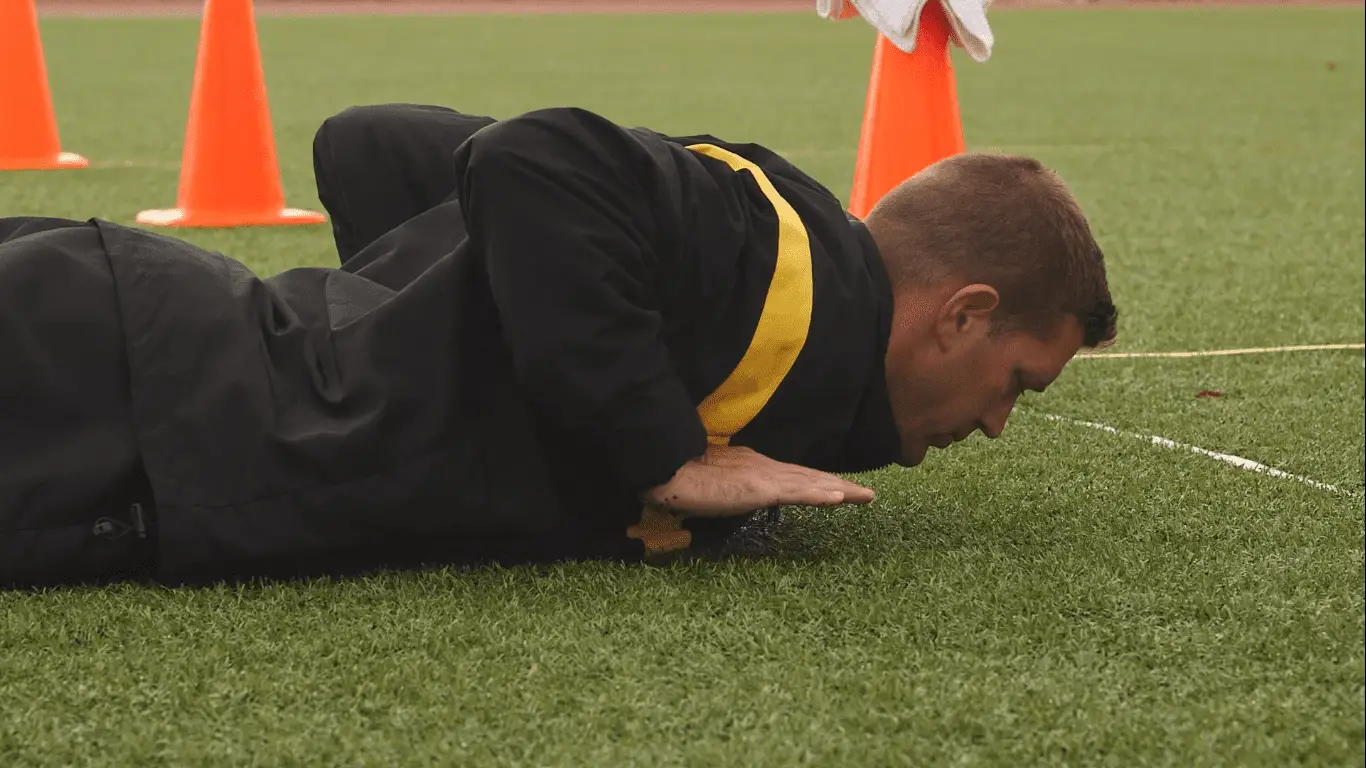
Movement 4
Regardless of the HRP protocol, Soldiers must ensure their hands are flat on the ground with the index fingers inside the outer edges of the shoulders (returning to the starting position). This completes one repetition.
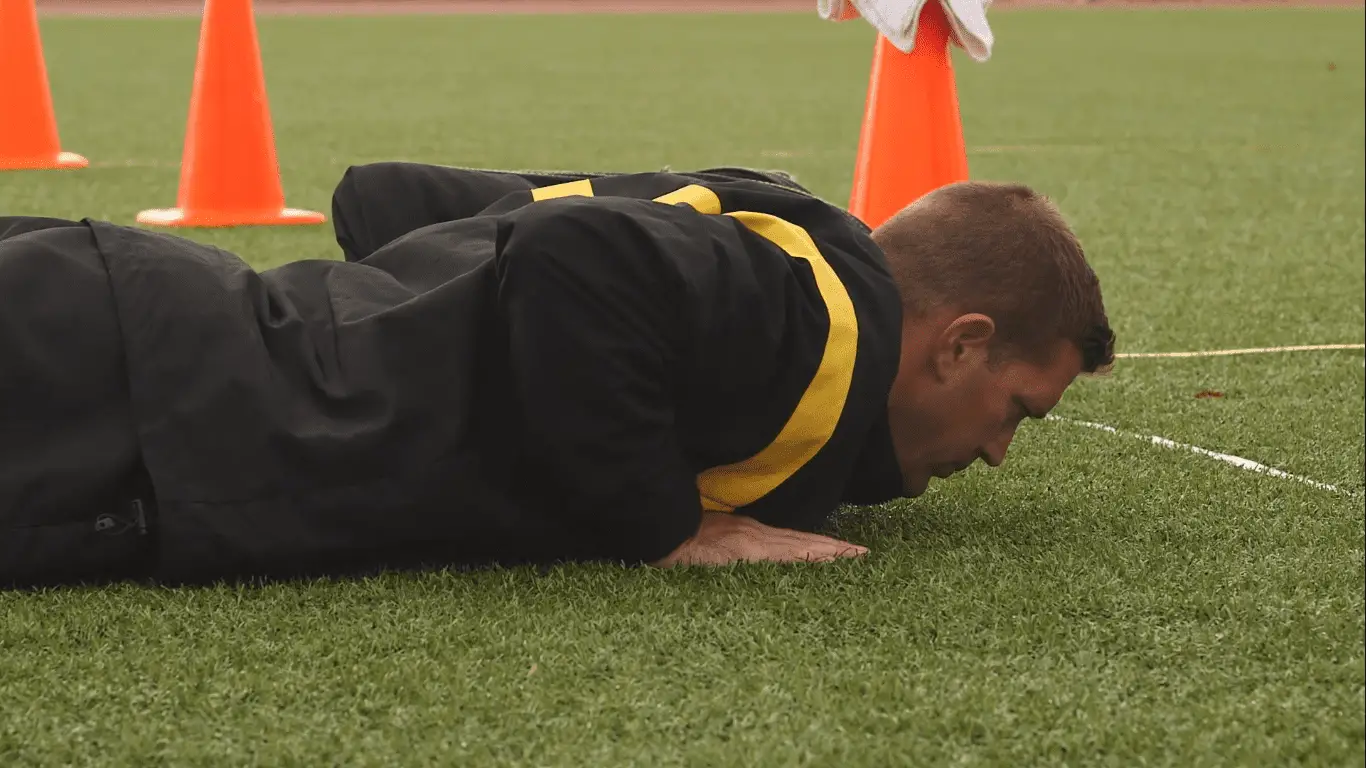
The Soldier will make an immediate move to place their hands back on the ground to return to the starting position.
Recommended Training:
Supine Chest Press
- The starting position for the supine chest press is the supine position with knees bent to 90 degrees, feet 8-12 inches apart, and flat on the ground. The head and upper arms are resting on the ground. Holding a kettlebell on the same weight in each hand using a closed pronated grip, bend the elbows to allow the kettlebells to rest on the front of the shoulders.
- On the command of “begin”, extend the elbows to raise the kettlebells straight up in front of the shoulders. Return to the starting position.
- Continue the exercise at your own pace for one minute. Increase or decrease the kettlebell weight if necessary, continuing only if the Supine Chest Press movement can be completed to standard.
8-Count T Push-Ups
- The starting position of the 8-count T push-up is the position of attention.
- On count 1, assume the squat position.
- On count 2, thrusts the legs backwards into the front leaning rest position.
- On count 3, bend the elbows lowering the body to the ground.
- On count 4, release the hands from the ground moving the arms directly out of the side into the T position. The same position used in the T-raise exercise. Hands may be on or off the ground in the T position.
- On count 5, place the hands on the ground beneath the shoulders.
- On count 6, perform a push-up from the ground into the front-leaning rest position. Keep the body in a straight line from the head to the bottom of the heels.
- On count 7, return to the squat position.
- On count 8, return to the starting position which is the position of attention.
- Complete 5 to 10 repetitions.
Incline Bench Press
- Here is a breakdown of the exercise as it would be conducted by an individual soldier using three types of free weights straight bar or barbell kettlebells and dumbbells.
- The starting position for the incline bench press is the supine position on an inclined bench with both feet on the ground and hips shoulders and head firmly against the bench. Grasp the barbell with a closed overhand pronated grip slightly wider than shoulder-width. Remove the bar from the supports placing it over the chest with elbows fully extended.
- From the starting position, bend both elbows to lower the weight to just above the chest. Press the weight back to the starting position. Do not jerk or shrug the shoulders, arch the back, or allow the hips off the bench during the movement.
- Repeat this movement for the correct number of repetitions and sets required to meet the goal of the free weight session.
Spotting Position for the Incline Bench Press
- The spotter stands at the head of the bench in the Straddle Stance with feet slightly staggered. The spotter grasps the bar with a closed alternating grip in between the lifter’s hands. On a signal from the lifter, the spotter assists the lifter with moving the bar from the supports to guide it over the lifter’s chest.
- Follow the path of the bar by slightly flexing the knees, hips, and trunk while maintaining a flat back. Keep an alternating grip position close to but not touching the bar as it is lowered to their chest.
- Reverse this movement until the lifter signals for an assist with returning the bar to the supports.
- If the lifter becomes unstable or begins to fail to control the weight, immediately assist with completing the lift.
Quadraplex
- The starting position for the Quadraplex is a six-point position with the knees on the ground beneath the hips.
- On the command of “ready, EXERCISE”, raise the left leg and right hand until they are both straight and parallel to the ground.
- Head stays aligned with the spine. Do not let the back, shoulder, and trunk sag. Stay tall on the supporting shoulder.
- Hold this position for 60 seconds.
- To rest, return to the starting position for 3-5 seconds until resuming the effort.
- On the command of “starting position, MOVE”, return to the starting position.
- On the command of “change position, ready, EXERCISE”, repeat the exercise on the right.
Combat Readiness:
This mimics Pushing an opponent away during man-to-man contact, Getting to and from the ground during evasion and maneuver, and Reaching out from the prone position when shooting, taking cover, or low crawling.